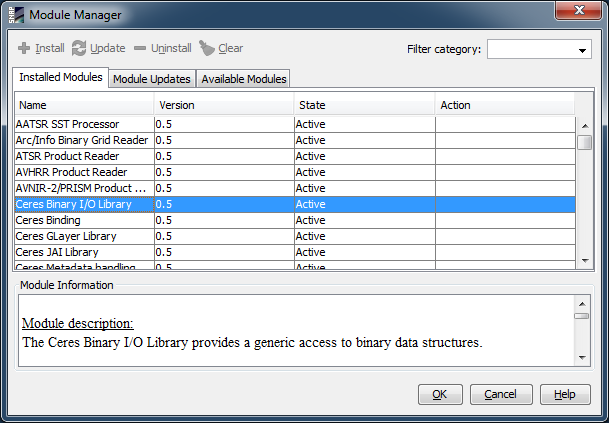
| Module Manager |  |
Modules are an integral part of the Sentinel Toolbox architecture. A module is a versioned and updatable software component. The entire SNAP software is composed of exchangeable modules. A few SNAP modules provide system functionality such as software libraries and programming interfaces whilst others act as plug-ins which add extra functionality to the system, such as product data readers, writers and processors.
The module manager is used to inspect installed modules, install new modules, update and uninstall existing modules.

To inspect a module, select it in the Installed Modules tab and browse the information panel below the modules table. In order to install a new, uninstall or update an existing module, select the module first, then click the corresponding Install, Update or Uninstall action button above the modules table. This will assign the action to the module. You can also select multiple modules. By right-clicking the selected modules, a context menu with the available actions will pop up.
If Module Updates or Available Modules tabs are selected the first time, the module manager will establish an internet connection to a remote module repository and download the available list of modules. The settings for the repository connection can be adjusted in the Preferences Dialog.
The actions are not performed before the OK button is clicked. The module manager may detect that the current set of actions will lead to an inconsistent software state. This mainly happens if dependencies on modules exists which are scheduled for uninstallation. In this case an error message will be displayed and no action will be performed. All actions are performed in the background so that you can continue working with with the Sentinel Toolbox. If an error occurs during the execution of action (e.g. connection failure, I/O errors), a rollback will be performed and all changes will become undone.
Note: All SNAP modules are stored in a directory named modules which is
located in the SNAP installation directory. You can also manually install modules by copying a
module file into the modules directory. Module files are usually named
<name>-<version>.jar. Similar modules are uninstalled by removing the
corresponding file from this directory.
Install button
Assigns the install action to all selected modules in the Available Modules tab.
Update button
Assigns the update action to all selected modules in the Module Updates tab and to updatable modules in the Installed Modules tab.
Uninstall button
Assigns the uninstall action to all selected modules in the Installed Modules tab. Note that system modules can only be updated, not uninstalled.
Clear button
Removes all actions of all selected modules.
Filter category drop-down list
If a category is selected from this list, only modules belonging to that category will be shown in the module tables.
Installed Modules tab
Displays all installed modules in a table.
Module Updates tab
Displays all modules for which an update exists in the remote module repository. If not already done, selecting this tab will cause the module manager to synchronize the installed modules with the modules in the remote module repository.
Available Modules tab
Displays all available modules of the remote module repository. If not already done, selecting this tab will cause the module manager to synchronize the installed modules with the modules in the remote module repository.
Module Information group
Displays information details such as the module's vendor and licensing for a single selected module.